Wednesday 19 September 2012

Design Team Call Entry for TPBP Oct 2012

Hi Everyone!

I'm excited to share with you a project I have created recently for a special friend of mine on YouTube! I am also submitting this project as my entry for The Piece by Piece design team call. If you aren't familiar with The Piece by Piece, please check out the etsy store here and the blog. For this project, I altered a wooden cigar box that you can find at Michael's Arts and Crafts store.

My friend have previously told me that her all time favorite paper collection is the Almanac by Prima Marketing Inc. I thought I'd surprise her by creating her something out of that paper collection (which is not what I'm normally used to creating). This project is more on the vintage-grunge style. As you may have noticed, those who follow my blog, I tend to lean on the shabby chic style of crafting. But, I must say, I had a lot of fun creating this box and will definitely explore the different styles in crafting.

Back to the project, I painted it first with light pink acrylic paint and once it was dry, I applied crackle medium and then applied vintage white acrylic paint once the medium dried. I wanted the crackling technique to show a lil more and so I distressed the box with Tim Holtz' Tea Dye Distress Ink. I wish I had taken step by step pictures to show the actual look of the distressed box without all the embellishments. I then applied a lace fabric on top of the box and sealing it with Modge Podge in Matte. After that, I distressed the lace again with Tea Dye Distress Ink by Tim Holtz. Now, I won't go into details with what I have done for the rest. I did record a video which I will be posting on YouTube once my friend has received it because it's a surprise! LOL! So if you would like to see the video, subscribe to jhoclueless.

So let the images talk:

top or front of box


side view
 
 I used a variety of I am Roses products as well


top view
 
 
 inside of the box


I also added an acrylic piece behind the lace to make the pocket more functional


I hope you like my project! I had so much fun creating this and I hope my friend will like it too. Thanks for taking the time to read this post! Have a great day!

Friday 7 September 2012

My First Copic Colored Images

So I thought it'd be for another couple of days until I post another blog but since I've got some free time before I head out today, I thought I'd go ahead.

I purchased some new copic markers recently and thought I'd give it a go for the second time. My first attempt with copic markers was a big fail. I thought I wasn't meant to copic color at all as I was coloring out of the lines, I wasn't shading properly and that I also thought my hand was just too heavy for copic markers. After watching a lot of copic coloring tutorial on YouTube, I finally braved it and gave copic markers a second chance. So with much more patience and tries, this time.. I somehow I achieved what I say, an "okay" copic coloring and shading with my first two images.

Here they are:


For my first card, I used the Hula Marci stamp image from the La la land Crafts
I also used the Seaside collection by Kaisercraft, Cheery Lynn's Elegant Flourish die, a burlap trim and several S10 flowers to line up the bottom along with some raffia to make the frame card look like a stage. Oh, I made this card into a frame card and there are several different kinds of tutorial out there on how to make it. 
 
side view

 
inside of the card: I punched the edges of the patterned paper in the bottom of the card with my Martha Stewart flourish lace punch around the page
 
 
For my 2nd card, I made a shadowbox card (There are also several tutorials out there on how to make this type of card). I used Birthday Marci stamp image by La la land Crafts and as you can probably see, my copic shading has improved somewhat better here but I need a lot more practice. I also used Prima's Tea Thyme paper collection, some trims from my stash, my spellbinders die to create the frame and matting for my image and of course a few I am Roses flowers and butterflies.

 
back view: I adhered a note card from the same collection by Prima where I will put my message on

side view
 
 
I hope you like these two cards with my first copic colored images. I will definitely be playing more with my copic markers. You can also watch my video on these two cards here.


DCWV Preppy Princess

I'm finally back! Phew! I didn't think having two kids could take up too much of my free time in the beginning but now that my son (yes, I had a baby boy!) is almost three months old, I figured it's time to get rolling with my crafting. I have created a few things during my most hectic times with a newborn but have never posted them on my blog. Now that we've got a routine and my son isn't so fussy anymore, I'm going to try to update my blog as often as I can but there's still no promising.

So here's my first update on one of my recent creations...

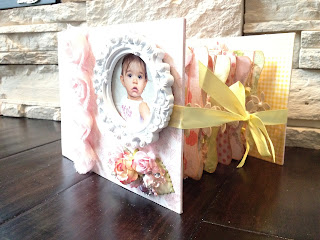
Our family friends' daughter had her very first birthday a month ago and had her cake smash/family photo session taken prior to her birthday. I already have her newborn and their family photos so I thought I'd incorporate her recent photos and create a mini album for her as part of her birthday gift from my family. This was no surprise to them because I have already made them a family mini album from a few years back and they absolutely loved it and I offered again to create another one for their daughter, Myla.

For this mini album, I used the "Preppy Princess" paper stack by DCWV. I thought it was suiting for the little girl as I incorporated not only newborn photos but also her cake smash and some family photos. The album didn't come out "baby-ish" but more of a fun, chic mini album for a lil girl. I've also used a variety of Prima and I am Roses flowers - which absolutely made the mini album even more beautiful. For a more detailed look and items I've used, you can watch my video here.

Here are some images of the the Preppy Princess mini album:

 
front cover


first few pages (this mini has a total of 20 pages - front and back)


a few more pages ... Sorry about the poor quality of these images, I couldn't find a perfect spot with good lighting in our home.


This next page, I created a mini envelope accordion so that I can add more photos


This next page, I created a wallet to add her cake smash photos in. I didn't get to take pictures of the inside of the wallet but if you watch my video here, I did a walk through of the whole mini album.
 
 
And oh, this whole mini album is composed of paper bags with inserts/tags which I also finished with photos.
 
 
I'm very happy with how this mini album turned out! Myla's mom loves it and has kept saying it's beautiful. Don't forget to watch my detailed video of this mini album here.
 
I'll have another post of more of my recent creations in the next couple of days. 
 
Have a great weekend!
 
 
Products used:
 
DCWV Preppy Princess
 
I am Roses
 
Prima
 
Martha Stewart
 
Spellbinders
 
Cheery Lynn Designs